Beijing Central Axis: a one-way heritage and photo route
Beijing's Central Axis is 7.8 kilometres of urban order, running from the Bell and Drum Towers in the north to Yongdingmen in the south. It passes bridges, a hill, the Forbidden City, ceremonial gates, a modern civic square, commercial streets and the reconstructed southern gate. UNESCO inscribed the ensemble in 2024 because these layers show how an imperial capital used symmetry, hierarchy and ritual to organize a whole city.
The line on a map is deceptively simple. It is not one continuously open pedestrian avenue. The Forbidden City has a south-to-north one-way visitor flow, Tiananmen Square requires its own reservation and security check, Jingshan has separate admission, and major roads or walls force detours. A useful route must therefore choose between seeing the axis from public space and entering the buildings that sit on it.
This guide gives you three honest choices:
- 5 km highlights route: Bell Tower → Drum Tower → Wanning Bridge → Jingshan → eastern Forbidden City moat → Tiananmen Square → Zhengyangmen. Choose this for the strongest axis views in one day without entering the Forbidden City.
- 9–10 km full ground route: continue from Zhengyangmen through Qianmen and Tianqiao to Yongdingmen. Choose this when walking the historic north-to-south line is the main purpose of the day.
- Reserved palace route: Tiananmen Square → Meridian Gate → Forbidden City → Jingshan → Wanning Bridge → Drum and Bell Towers. Choose this when you already hold a Forbidden City ticket. It runs in the opposite direction because the palace cannot be entered from the north.
The first two routes use text and exact map pins rather than a stylized route poster. The checked public-road legs total about 8.8 km before the Jingshan climb, security approaches and photo detours, so the full day normally reaches 9–10 km. Allow much more time than the map's walking estimate. If you have not committed to the Axis, compare it with old-city lanes, Sanlitun and the Dongjiaominxiang–Qianmen architecture route in the Beijing Citywalk chooser.
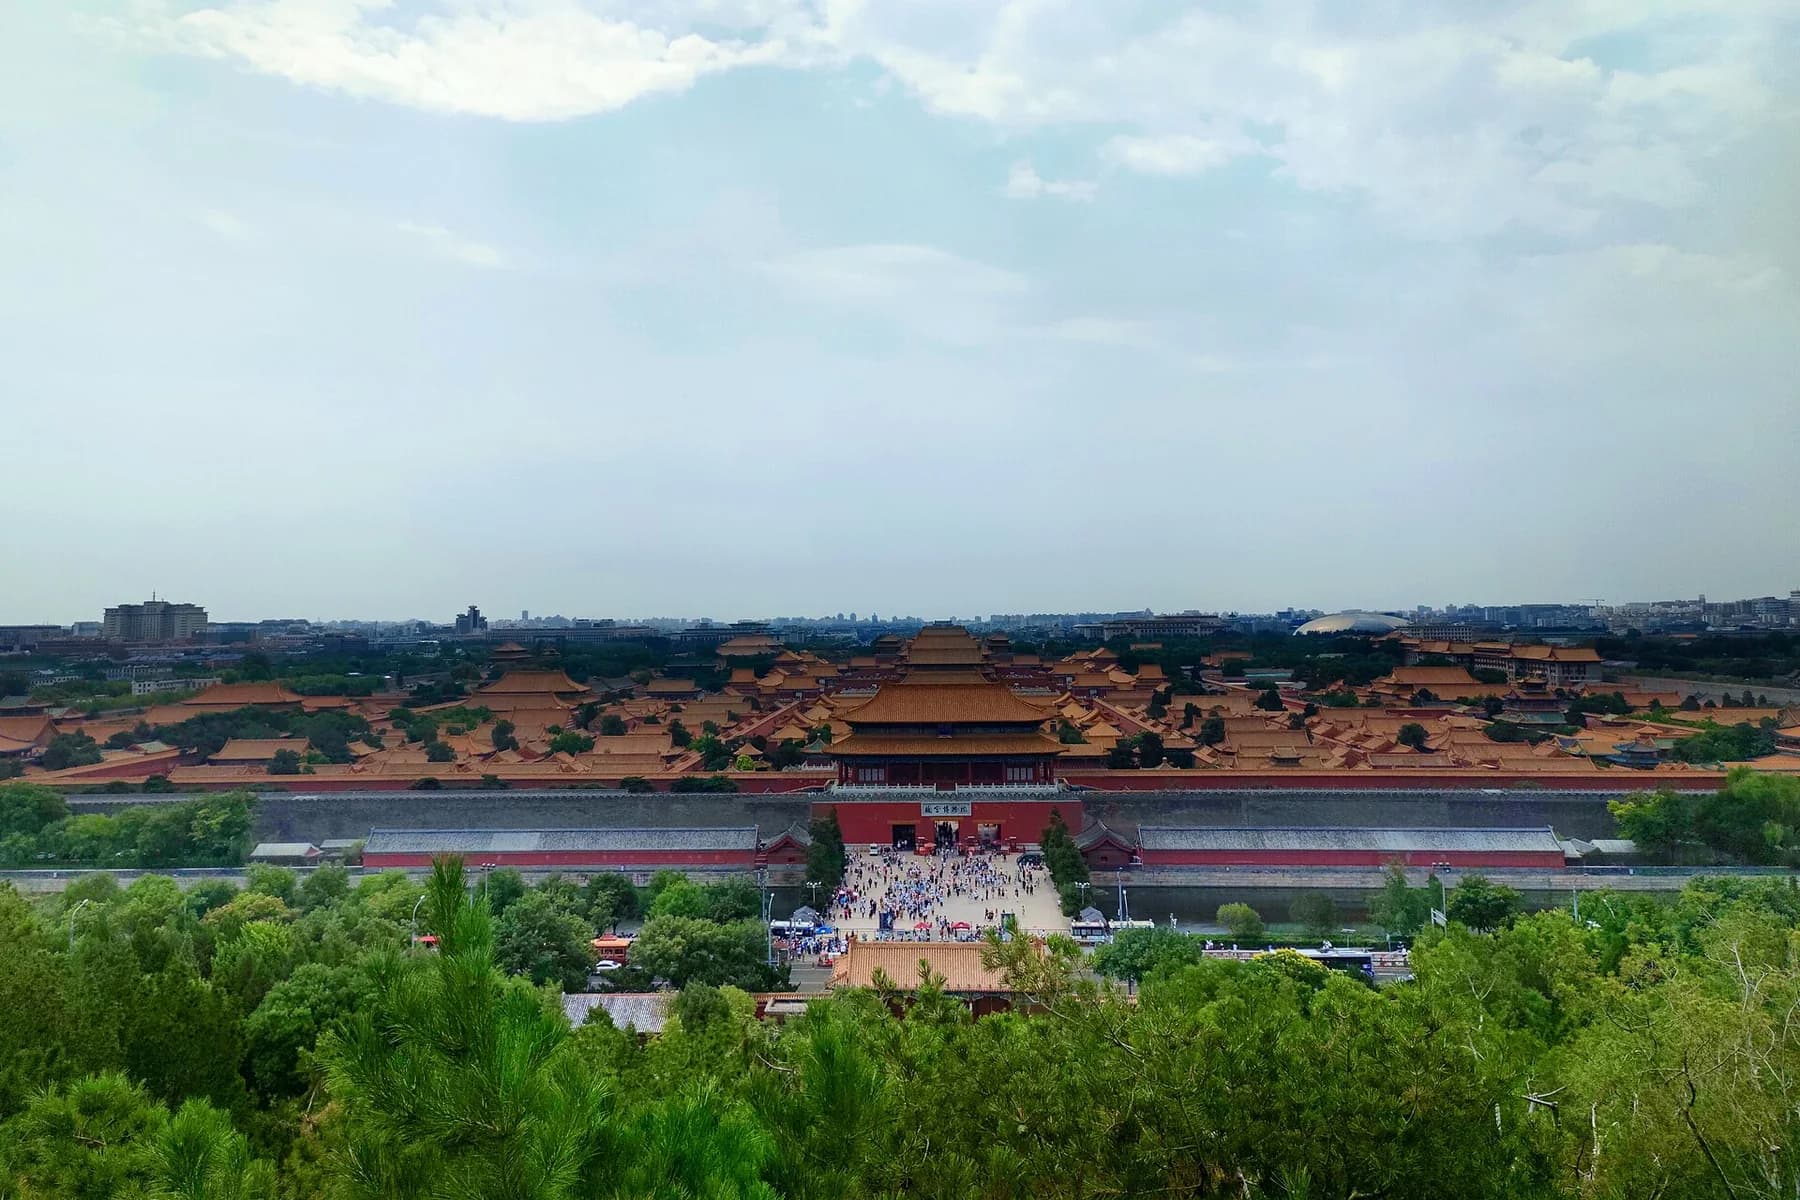
This is the route's defining photograph. From Wanchun Pavilion, the palace roofs, gates and courtyards become one ordered sequence rather than a collection of separate monuments. The position is public and repeatable when the pavilion is open, but haze, crowding and temporary controls change the result.
Photograph by CNHowey, adapted from Wikimedia Commons under CC BY-SA 4.0.Choose the version before making reservations
Choose the 5 km highlights route for photography
Start near the Bell Tower in the morning and finish at Zhengyangmen in the afternoon. This is the best balance of old-city street scale, the Jingshan panorama, palace-wall geometry and monumental symmetry. You do not enter the Forbidden City. The surface route goes around its eastern side after Jingshan.
Plan 5–7 hours with the Jingshan climb and Tiananmen security. Add 45–60 minutes if entering one of the Bell or Drum Towers. The route can remain inexpensive: only Jingshan and optional tower interiors need paid admission, while Tiananmen Square is free but reserved.
Choose the 9–10 km full route for the complete urban story
Continue south from Zhengyangmen through Qianmen Street, the Tianqiao area and Yongdingmen Park. This adds the transition from imperial inner-city gate to commercial street, performance district and outer-city gate. Plan 7–10 hours and keep interiors selective.
Do not interpret “full” as “enter every monument.” A Drum Tower interior, Jingshan, Tiananmen security, Zhengyangmen Gate Tower and several meal stops can already fill the day. The route succeeds when you read how the city's scale changes, not when you collect every ticket.
Choose the reserved palace route for the strongest heritage interior
If the Forbidden City is your priority, begin south of it and follow the required visitor flow north. A practical order is Tiananmen Square → Meridian Gate → the palace central axis → Gate of Divine Prowess → Jingshan Park. Continue to Wanning Bridge and the Drum and Bell Towers only if your legs and daylight remain good.
Do not start at the Bell Tower and expect to enter the palace through Gate of Divine Prowess. It is an exit. Do not add Yongdingmen after a deep palace visit unless you deliberately accept a long transit-assisted day.
Choose two half-days when photography matters more than completion
Use a northern half-day for the Bell and Drum Towers, Wanning Bridge and Jingshan. Use a southern half-day for Zhengyangmen, Qianmen, Tianqiao and Yongdingmen. This gives you morning or late-afternoon light twice and removes pressure from the Tiananmen security transition.
Reservation and opening checklist
Check these independently. One confirmation does not grant access to the next site.
- Tiananmen Square: free, but a real-name reservation is required through one of the officially listed reservation channels. Bring the original passport used for the booking and allow a security buffer. A Forbidden City or Zhengyangmen reservation can affect the route through the square, but never assume it replaces every verification step shown in your confirmation.
- Forbidden City: no same-day admission sales. General admission releases at 20:00 seven days before the visit and uses the original booking document. Follow the full Forbidden City ticket and route guide.
- Jingshan Park: normal admission is inexpensive and its grounds remain open later than most heritage interiors. Beijing's official English pages have published different foreign-visitor booking instructions at different times. Use the bilingual Visiting Beijing Parks / 畅游公园 platform or confirm with the park before travel, then carry your passport even if buying on site.
- Bell and Drum Towers: the maintained official channel is Beijing Bell and Drum Towers (北京钟鼓楼). As checked in September 2026, the joint ticket is CNY 30; peak-season hours are 09:30–17:30 and off-season hours are 09:30–16:30. Holiday arrangements can override them.
- Zhengyangmen Gate Tower: it reopened on July 27, 2026. The current official notice lists Tuesday–Sunday opening, 09:00–17:00, CNY 20 admission and daily ticket release at 17:00 through the Beijing Central Axis Heritage Protection Center's WeChat account. Monday holidays and special events can alter the pattern.
Carry as little as possible. Central-area security checks, stone steps and long exposed pavements make a heavy camera bag progressively less useful.
The 5 km highlights route, stop by stop
Stop 1: Bell Tower square establishes the northern endpoint
Open the exact Bell Tower map pin. The Bell Tower stands immediately north of the Drum Tower, and the space between them makes the north end of the axis visible at human scale.
Begin outside. From the northern or northwestern side of the square, use a medium focal length to isolate the red walls and green roof against the sky. From the central public space, align the Bell Tower and Drum Tower in one direction rather than photographing each as an unrelated facade.
Three useful frames are enough:
- 24–35mm establishing view: include the square and one tower with room for movement.
- 50–85mm axis compression: stand far enough back to place architectural layers behind each other.
- Detail frame: glazed tiles, painted brackets or the tower opening without cutting through pedestrian traffic.
Do not stand in the cycle flow or direct a portrait subject into the road. Early morning gives cleaner pavement; later morning gives stronger activity and pigeons but more groups.
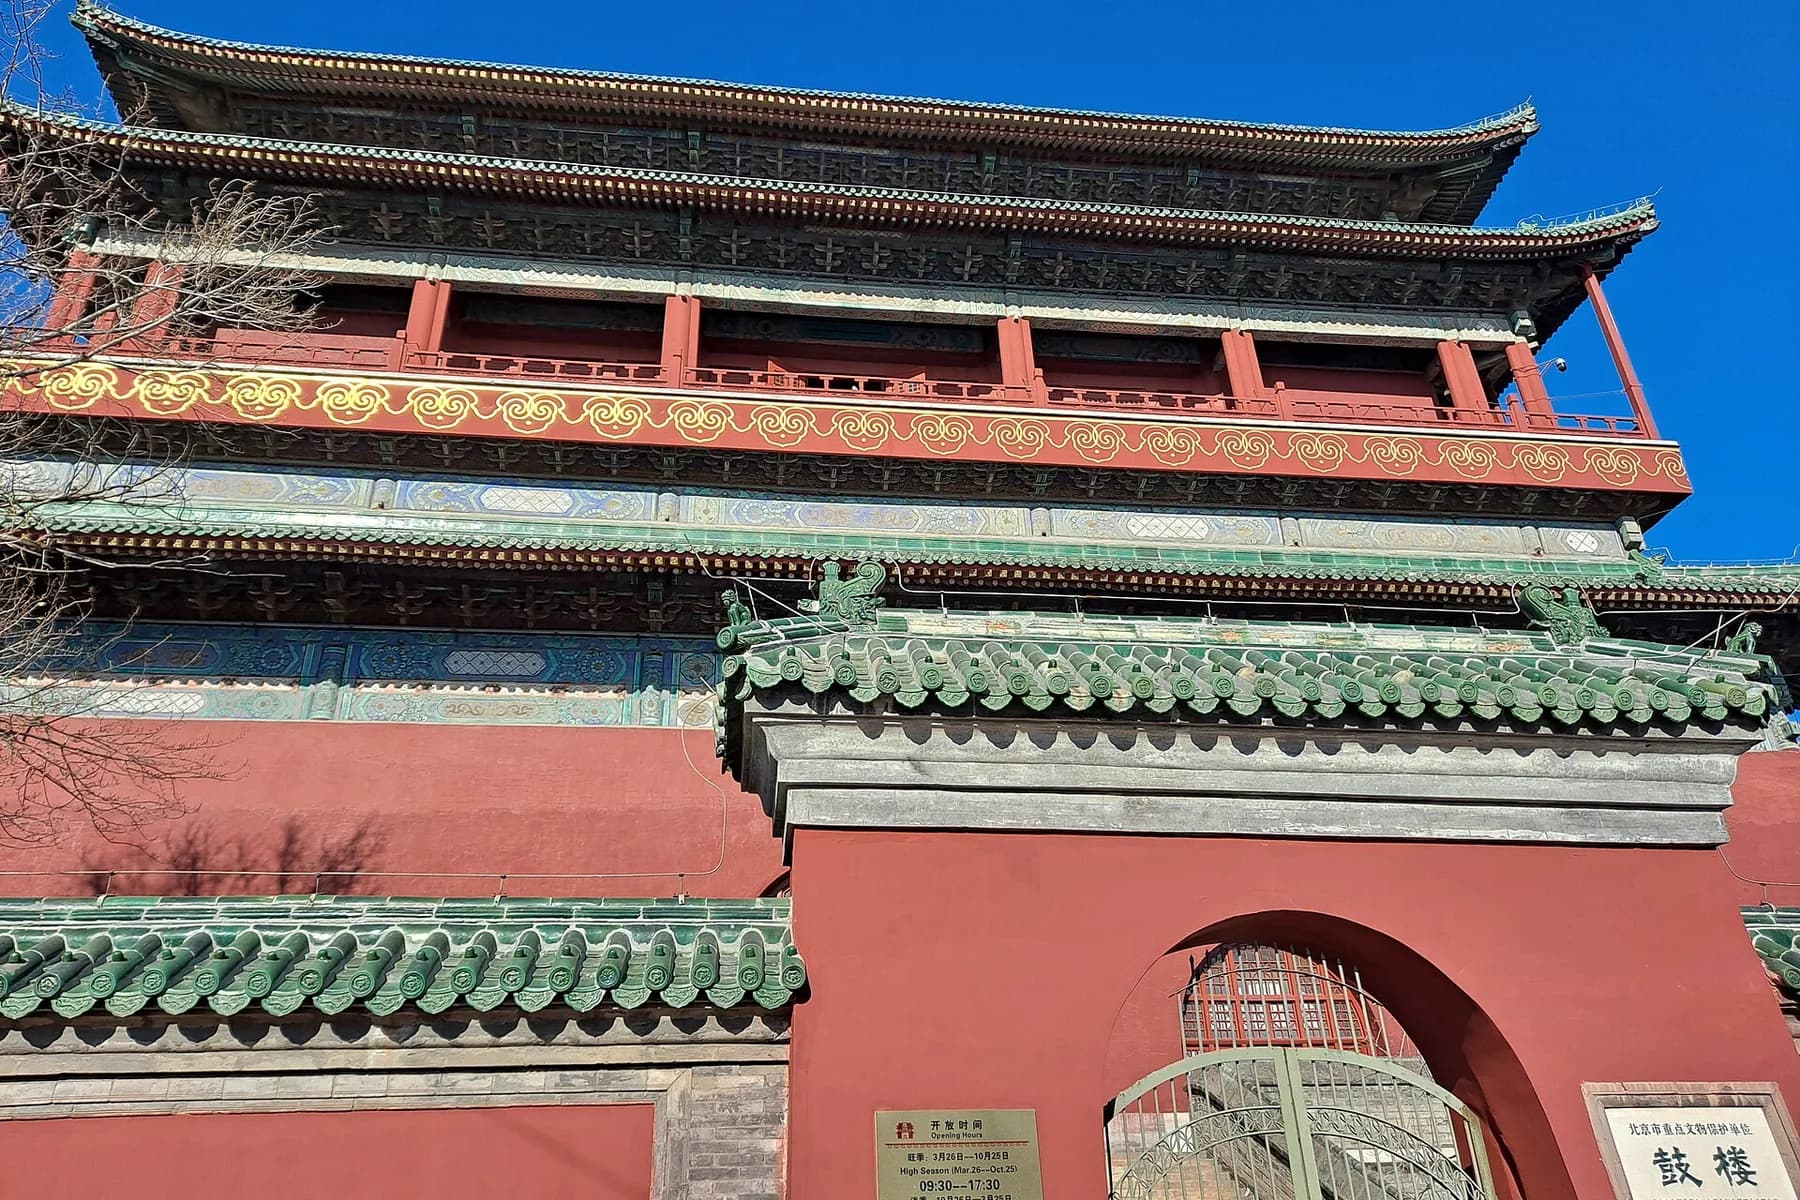
The photograph is a useful detail result rather than a promise of an empty square. At the site, make both the close architectural frame and a wider image that explains the relationship between the two towers.
Photograph by EditQ, released under CC0 1.0.The checked walk from the Bell Tower to the Drum Tower is only about 100 metres / 2 minutes.
Stop 2: decide whether the Drum Tower interior earns the time
The outside view proves the urban alignment. The interior adds steep stairs, timekeeping history, drums and an elevated look over roofs. Enter only if that interpretation matters; do not buy both tower interiors simply because a joint ticket exists.
From the southern side, look north through the open square to pair the Drum Tower with the Bell Tower. A 50–85mm lens or a phone's real telephoto camera reduces empty sky and strengthens the relationship. If you climb, look south for the continuation toward Jingshan, but respect window barriers and current photography signs.
The Drum Tower also connects naturally to the Beijing hutong route chooser. Choose that guide when neighbourhood lanes, Shichahai and resident life matter more than completing the monumental axis.
The checked walk from the Drum Tower to Wanning Bridge is about 600 metres / 9 minutes.
Stop 3: Wanning Bridge reveals the older city beneath the monuments
Wanning Bridge is smaller than the towers, but it is essential to the story. The stone bridge crosses the water system near Shichahai and preserves a point used in the axis since the Yuan capital. Its value is not a huge skyline picture; it is evidence that the ceremonial line also had to cross real terrain and water.
Work from legal pavement and make one low, oblique frame showing stone, water and passing city life. Do not lean over the traffic edge or block the narrow bridge for a centered portrait. If the water or carved details are hard to see, record a contextual image and continue rather than forcing a dramatic result.
The Shichahai guide is the right continuation when lakes and hutongs are the day's main subject. On the axis route, keep moving south.
The checked walk from Wanning Bridge to Jingshan is about 1.4 km / 20 minutes before entry and internal climbing. Di'anmen Street carries ordinary traffic; use crossings and do not treat the painted road centre as a photo position.
Stop 4: climb Jingshan for the only complete visual explanation
Use the Jingshan Park map pin. Enter through the gate that matches current route controls, then climb to Wanchun Pavilion. The ascent is short but steep and crowded. Ground-level garden access does not mean the summit is step-free.
At the pavilion, photograph in four directions:
- South: the Forbidden City central sequence. Start at 24–35mm, keep the horizon level and protect bright sky.
- North: the line toward the Drum and Bell Towers. A longer lens helps the towers emerge from the surrounding roofs.
- West: Beihai's White Dagoba provides a deliberately off-axis comparison.
- East: the modern skyline shows how the historic centre sits within a much larger metropolis.
For the classic south view, place Gate of Divine Prowess near the lower centre and allow the major halls to step back through the frame. A phone's 1× lens records the whole palace; 2× or 3× gives stronger roof compression. Do not hold a position after finishing—Wanchun Pavilion has limited railing space.
Morning after rain or a cold front often gives the clearest long view. Sunset gives warm roofs but the densest crowd. Arrive 45–60 minutes before the desired light so you can identify the view before the final colour.
Stop 5: use the palace moat instead of pretending you can walk through the palace
For the public highlights route, leave Jingshan and move around the Forbidden City's eastern side. The checked route from Jingshan's south side to Tiananmen Square is about 2.3 km / 31 minutes, but security fencing and controlled crossings can add distance.
At Gate of Divine Prowess, make a frontal image from the legal public area. Then use the moat corner or eastern wall for a diagonal frame: red wall, water, corner tower and a receding line are more informative than another centered gate.
Do not follow a map line through a closed gate. Meridian Gate is the only normal visitor entrance, and Gate of Divine Prowess is an exit. If the Forbidden City is booked, use the separate south-to-north route described later on this page.
Stop 6: treat Tiananmen Square as a controlled site, not a shortcut
Open the Tiananmen Square map pin, but follow the entry point and time shown by the official reservation system. Large distances, barriers and security queues mean that reaching the mapped centre is not the same as reaching the checkpoint.
Inside, build the picture through scale and alignment:
- use a wide horizontal view for the gate, open foreground and national civic buildings;
- use 50–85mm to compress Tiananmen Gate, the Monument to the People's Heroes and Zhengyangmen into stronger visual layers where the permitted angle allows;
- keep verticals straight and leave room around the main structure rather than pushing the building against the frame;
- avoid photographing security procedures or obstructing controlled movement.
Tripods, staged costume shoots and repeated group setups are poor fits for this security-sensitive space. A phone or small handheld camera is the practical choice.
Stop 7: Zhengyangmen completes the highlights route
Open the exact Zhengyangmen Gate Tower pin. The gate tower and arrow tower mark the transition from the civic square to Qianmen's commercial street.
The strongest free view is outside: use the road and open forecourt as leading space, then make a tighter image of the roof and wall. The reopened Gate Tower interior adds models, historical interpretation and a higher view, but it is a separate reserved product. Its entrance currently depends on access through Tiananmen Square, so read the confirmation route instead of approaching the building from whichever side looks closest on a map.
Viral posts often show elevated views from Beijing Fun shops, a bookstore window or a hotel restaurant terrace. These are commercial premises, and past non-purchase access does not create a permanent public right. Use them only when the business is open, staff permit photography and any purchase or reservation condition is clear. The route does not depend on them.
At this point, the highlights route is complete. Leave via Qianmen Station or continue south for the full route.
Continue to Yongdingmen for the full route
Stop 8: Qianmen Street changes the scale from ceremony to commerce
Walk south from Zhengyangmen through the public Qianmen area. The exact line between barriers can change; follow the live crossing rather than trying to preserve a perfectly straight GPS track.
Use Qianmen Street for street-level layers:
- frame the archway or gate at the end of the long pedestrian perspective;
- wait for the tram only if it arrives naturally—do not stand in its path or build the route around a timetable you have not checked;
- make one shopfront or sign detail that explains commercial continuity;
- turn around for a reverse view so the gate remains part of the sequence.
Eat here if the full route is your main task. Choose a visible, operating restaurant with an itemized menu and a manageable queue. A famous old name is not worth losing the remaining daylight.
If you prefer interpretation, the existing Trip.com English Qianmen, Dashilan and Sanlihe walk covers a focused three-hour commercial tour near this section. Confirm the selected date, meeting point, minimum booking size and cancellation terms. It does not replace the full Central Axis walk.
Stop 9: Tianqiao is the transition, not a headline monument
Continue to Tianqiao Civic Square. From the southern Qianmen area, the checked walk is about 800 metres / 11 minutes; your actual Qianmen starting point can add distance.
Tianqiao's historical role in popular entertainment and performance helps explain why the southern axis feels different from the palace section. Photograph the relationship among the street, public square and ordinary movement rather than expecting another imperial gate.
This is also a sensible exit point. Tianqiao Station on Line 8 lets you stop when heat, darkness or fatigue makes the final exposed section unhelpful.
Stop 10: finish at Yongdingmen with space and symmetry
The checked walk from Tianqiao to Yongdingmen Gate Tower is about 1.4 km / 19 minutes. Use the park paths and controlled crossings; the broad roadway makes the straight visual line different from the safe pedestrian line.
Yongdingmen was demolished in the 1950s and reconstructed in 2005. State that history honestly. The gate is the southern marker of the historic axis, but the current building is not intact Ming fabric.
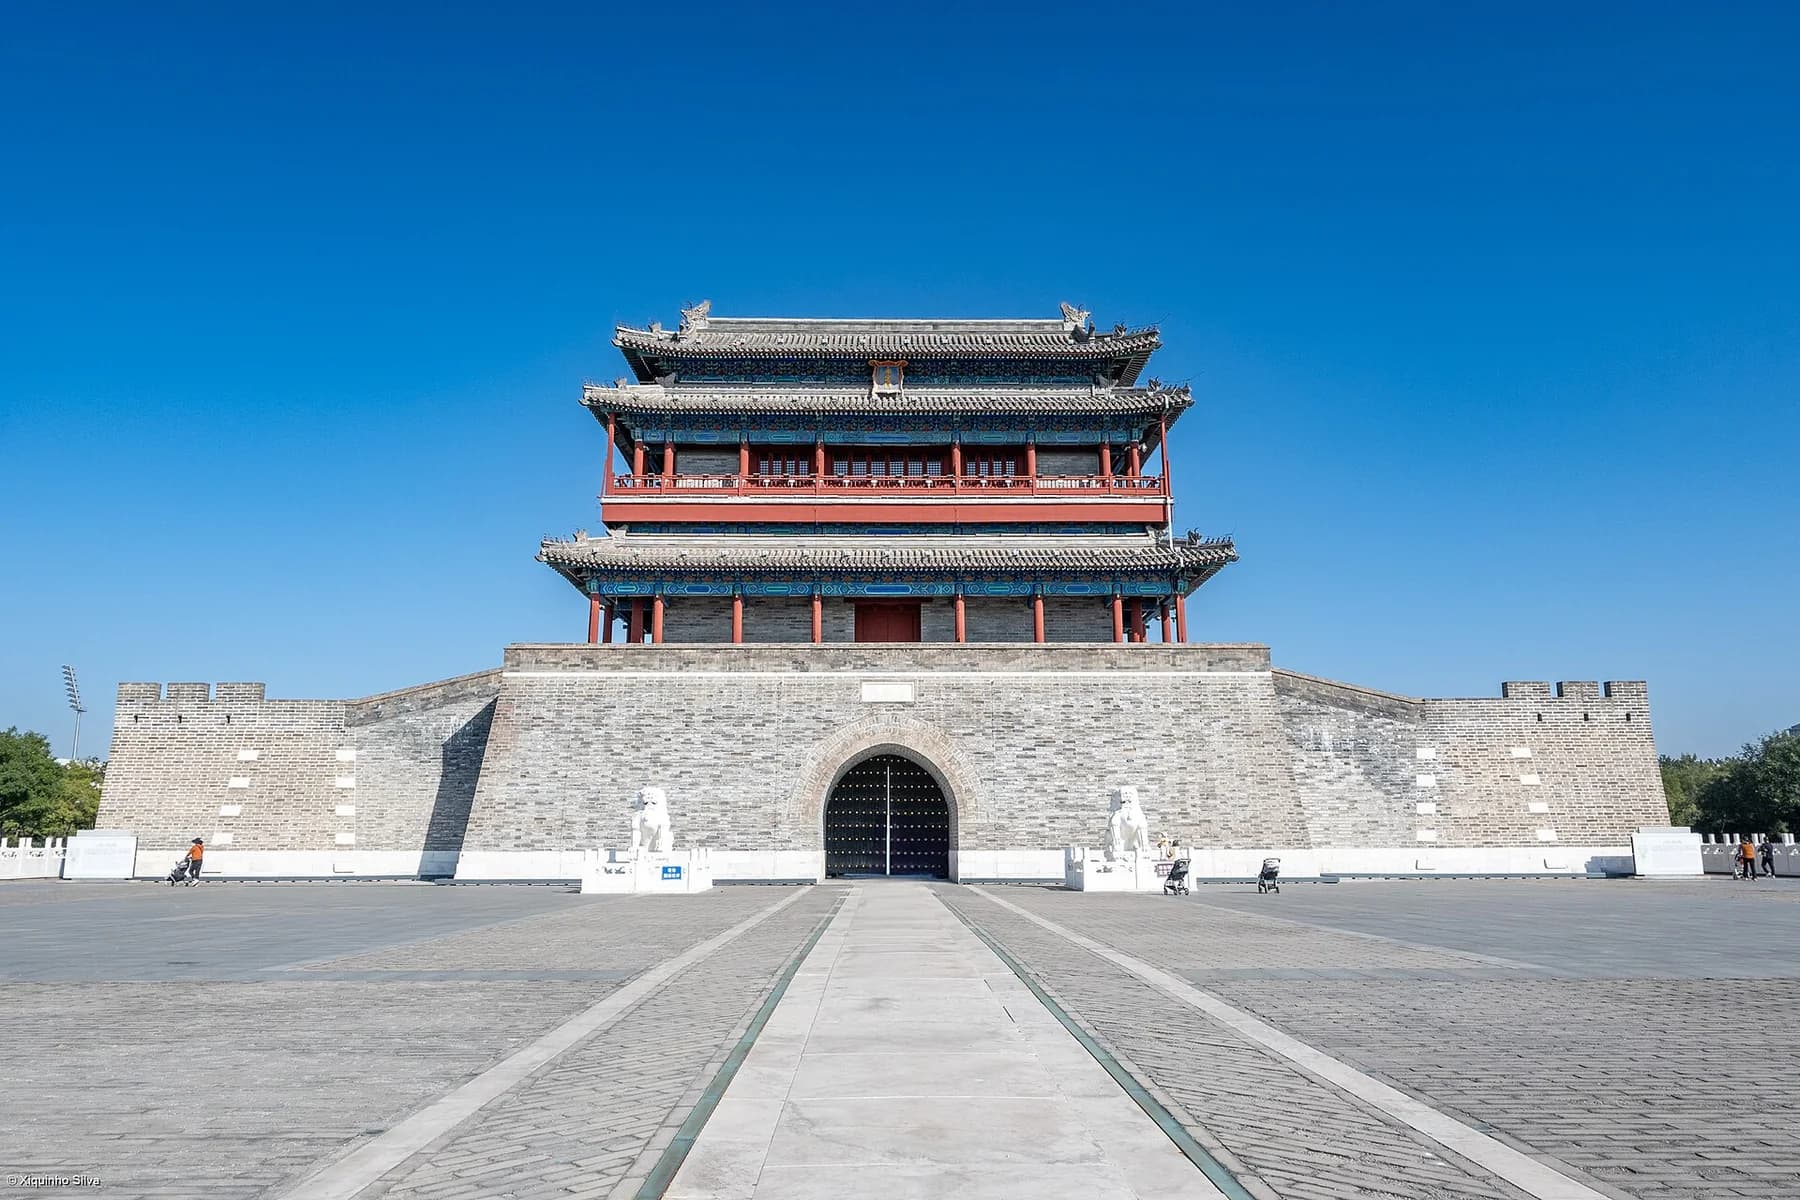
The central pavement makes the repeatable result clear: keep the camera level, use the paved line as a visual guide and leave enough blue sky around the roof. A 35–50mm field of view preserves symmetry without exaggerating the nearest paving stones. Move aside after composing; the plaza is a shared public space.
Photograph by xiquinhosilva, adapted from Wikimedia Commons under CC BY 4.0.Late afternoon gives definition to the roof and walls; blue hour makes the gate stand against a deeper sky when lighting is operating. Do not promise a fixed illumination time. Finish with the wide symmetrical image, one tighter roof detail and a reverse view north that suggests the distance already walked.
If you have a Forbidden City ticket, reverse the route
A palace day should follow the building's real circulation:
- Enter your reserved Tiananmen area with enough security margin.
- Reach Meridian Gate through the controlled approach.
- Follow the Forbidden City's central sequence south to north.
- Exit at Gate of Divine Prowess.
- Cross to Jingshan and climb only if visibility and energy justify it.
- Continue north to Wanning Bridge, Drum Tower and Bell Tower if their opening hours still fit.
This version gives the most coherent heritage narrative because you physically pass through the ceremonial centre. It also consumes the most attention. The palace central route alone can take two to three hours, and a side gallery can turn it into a half or full day.
Do not attach Qianmen, Tianqiao and Yongdingmen after a deep palace visit merely to say you completed the axis. Use the southern half-day on another date. The three-day Beijing itinerary already protects the palace–Jingshan sequence as the first major day; this guide explains how to extend it without destroying that priority.
A twelve-photo edit that explains the axis
Aim for a varied final set instead of one centered facade at every stop.
- Bell Tower with public-square context.
- Bell and Drum Towers compressed into one north-end relationship.
- Drum Tower painted bracket or roof detail.
- Wanning Bridge stone, water and city movement.
- Forbidden City roofs from Wanchun Pavilion.
- Northward view from Jingshan toward the towers.
- Gate of Divine Prowess or a moat-corner diagonal.
- Tiananmen Square as open civic scale.
- Zhengyangmen and its arrow-tower relationship.
- Qianmen street perspective with one moving element.
- Tianqiao public-life transition.
- Yongdingmen centered on the southern endpoint.
A good edit alternates wide, compressed and detail frames. The Central Axis is a planning idea, so the photographs should show relationships between buildings, streets and open space—not twelve isolated monuments.
Phone and camera choices
Phone
- Use 1× for most public-space views and 2× or 3× for tower alignment and roof compression.
- Reserve 0.5× for a close gate or very tight forecourt. Keep roof corners away from the extreme edges.
- Turn on the grid and align the building's true centre with the frame before correcting perspective.
- Tap the brightest roof or sky and lower exposure slightly. Red walls tolerate lifted shadows better than white sky tolerates clipping.
- Use a short Night mode capture only when people and vehicles are relatively still. Long handheld processing can double moving subjects.
Camera
A 24–70mm zoom covers almost everything. A 70–200mm is useful from Jingshan and for tower alignment, but the weight is hard to justify if you are walking the full route.
- Architecture in daylight: begin around f/5.6–f/8 and keep shutter speed high enough for handheld sharpness.
- Crowded public space: use 1/250 second or faster when people are part of the frame.
- Jingshan panorama: focus about one third into the palace depth and check both roof detail and sky highlights.
- Blue hour at Yongdingmen: stabilize against your body or use a permitted compact support outside pedestrian flow; do not assume a full tripod will pass every central-area security check.
Weather, seasons and crowd decisions
Clear day after wind or rain
Prioritize Jingshan and bring the longer lens. Visibility decides whether the north–south compression works. A crisp morning is usually more valuable than a famous sunset in haze.
Summer heat
Use the 5 km route or split the route. Large areas around Jingshan, Tiananmen and the southern axis are exposed. Carry water, add an indoor meal break and stop at Tianqiao if heat removes the value of the final section.
Autumn
Clear air and warm foliage can be excellent, but popular weeks increase security and crowd time. Do not schedule the route by walking distance alone. Build margins around every controlled site.
Winter
Cold wind can make the open square and Yongdingmen forecourt much harder than the temperature suggests. The air may be clear and the light crisp, but tower and park closing times are earlier. Start sooner and use gloves that still operate a phone.
Haze or low visibility
Skip the long-lens Jingshan plan. Photograph painted brackets at the Drum Tower, stone at Wanning Bridge, palace-wall geometry and the repeated gate forms. The route still works as architecture and urban history.
Rain, snow or ice
Red walls and wet paving can look strong, but Jingshan steps and polished stone require caution. Do not pursue an empty symmetrical image from the road. Follow closures, use handrails and leave the summit when wind or ice makes the pavilion unsafe.
Cycling is a separate plan
Shared bicycles can shorten ordinary street sections, and visitor reports often describe riding between the north and south endpoints. The central security area, crowded pedestrian streets, no-parking zones and park interiors make a continuous bike route unreliable.
If cycling is the main experience:
- ride only on streets where current rules and lane design permit it;
- park legally before Jingshan, Tiananmen security and Qianmen pedestrian areas;
- never assume a shared bike will remain available after a long interior visit;
- use a live map for the day's restrictions;
- carry the bike plan as a transport option, not as permission to ride through every heritage component.
Walking remains the clearer choice for the 5 km highlights route. A transit-assisted two-half-day plan is better for travellers who cannot comfortably cover 9–10 km.
Public-space and photography boundaries
- A bookstore, hotel terrace, restaurant roof or shopping-centre window is private commercial space even when an old post called it free.
- A Tiananmen reservation is access to a controlled civic site, not permission for a commercial shoot or equipment setup.
- Do not step into road medians, cycle lanes or closed ceremonial approaches for perfect symmetry.
- Avoid identifiable close portraits without consent, especially around security-sensitive sites.
- Do not fly a drone over the central historic area without all current permissions and airspace checks.
- Follow temporary barriers immediately. Major events, political meetings, conservation and crowd control can change access with little notice.
The public route always has a fallback: use the exterior, record the relationship and move to the next layer.
Connect it to the rest of Beijing
Use the main Beijing travel guide to secure fixed reservations before assigning this walk. The Beijing hutong routes answer a different question: they choose among residential lanes, lakes, temples, food districts and early twentieth-century streets. Use the Central Axis page for monumental order and long urban alignment; use the hutong guide for neighbourhood life.
The four-day Beijing itinerary has enough space to place the southern half-route on a separate day. The Temple of Heaven guide covers a major ceremonial complex east of the southern road line; give it a focused half-day rather than adding its internal axis to the end of a 10 km walk.
Final decision checklist
- Choose the 5 km highlights route, full 9–10 km route or reserved palace route.
- Reserve Tiananmen Square separately and carry the original passport.
- Secure the Forbidden City before planning the palace version.
- Check Jingshan, Bell/Drum and Zhengyangmen live hours independently.
- Save these English–Chinese pairs: Bell Tower (钟楼); Drum Tower (鼓楼); Wanning Bridge (万宁桥); Jingshan Park (景山公园); Forbidden City's Shenwu Gate (故宫神武门); Tiananmen Square (天安门广场); Zhengyangmen Gate (正阳门); Qianmen Street (前门大街); Tianqiao (天桥); Yongdingmen Gate (永定门).
- Carry one small camera setup and enough water.
- Keep the Jingshan summit and Yongdingmen finish conditional on visibility, weather and energy.
- Treat commercial elevated viewpoints as optional businesses, not public route anchors.
- Stop at Zhengyangmen or Tianqiao when the final kilometres no longer add value.
The route works when you understand why the spaces change: timekeeping towers and neighbourhood water in the north, imperial palace and ritual centre in the middle, then civic square, commerce, performance and the outer-city gate in the south. That sequence is the content of the Central Axis—not simply a straight line on a map.