Shanghai free skyline photo spots: a blue-hour route
Shanghai's skyline is easiest to understand from the river. On the west bank, the historic Bund faces the towers of Lujiazui. Farther north, Suzhou Creek, Waibaidu Bridge and the North Bund add steel bridges, red-brick buildings, lawns, boats and a wider angle that can hold old Shanghai and new Pudong in one frame.
The useful approach is not to collect eighteen unrelated pins across the city. It is to choose a visual result, arrive for the right light, and follow one public route without depending on a rooftop, restaurant table or hotel window. This guide gives you eight free public viewpoints, a 3.3 km full route, a shorter North Bund version, and twelve photographs that form a varied final set.
The viewpoints themselves are free. A Huangpu public ferry costs a small transit fare, and any sightseeing cruise is a separate paid choice. You can complete the main route without buying either.
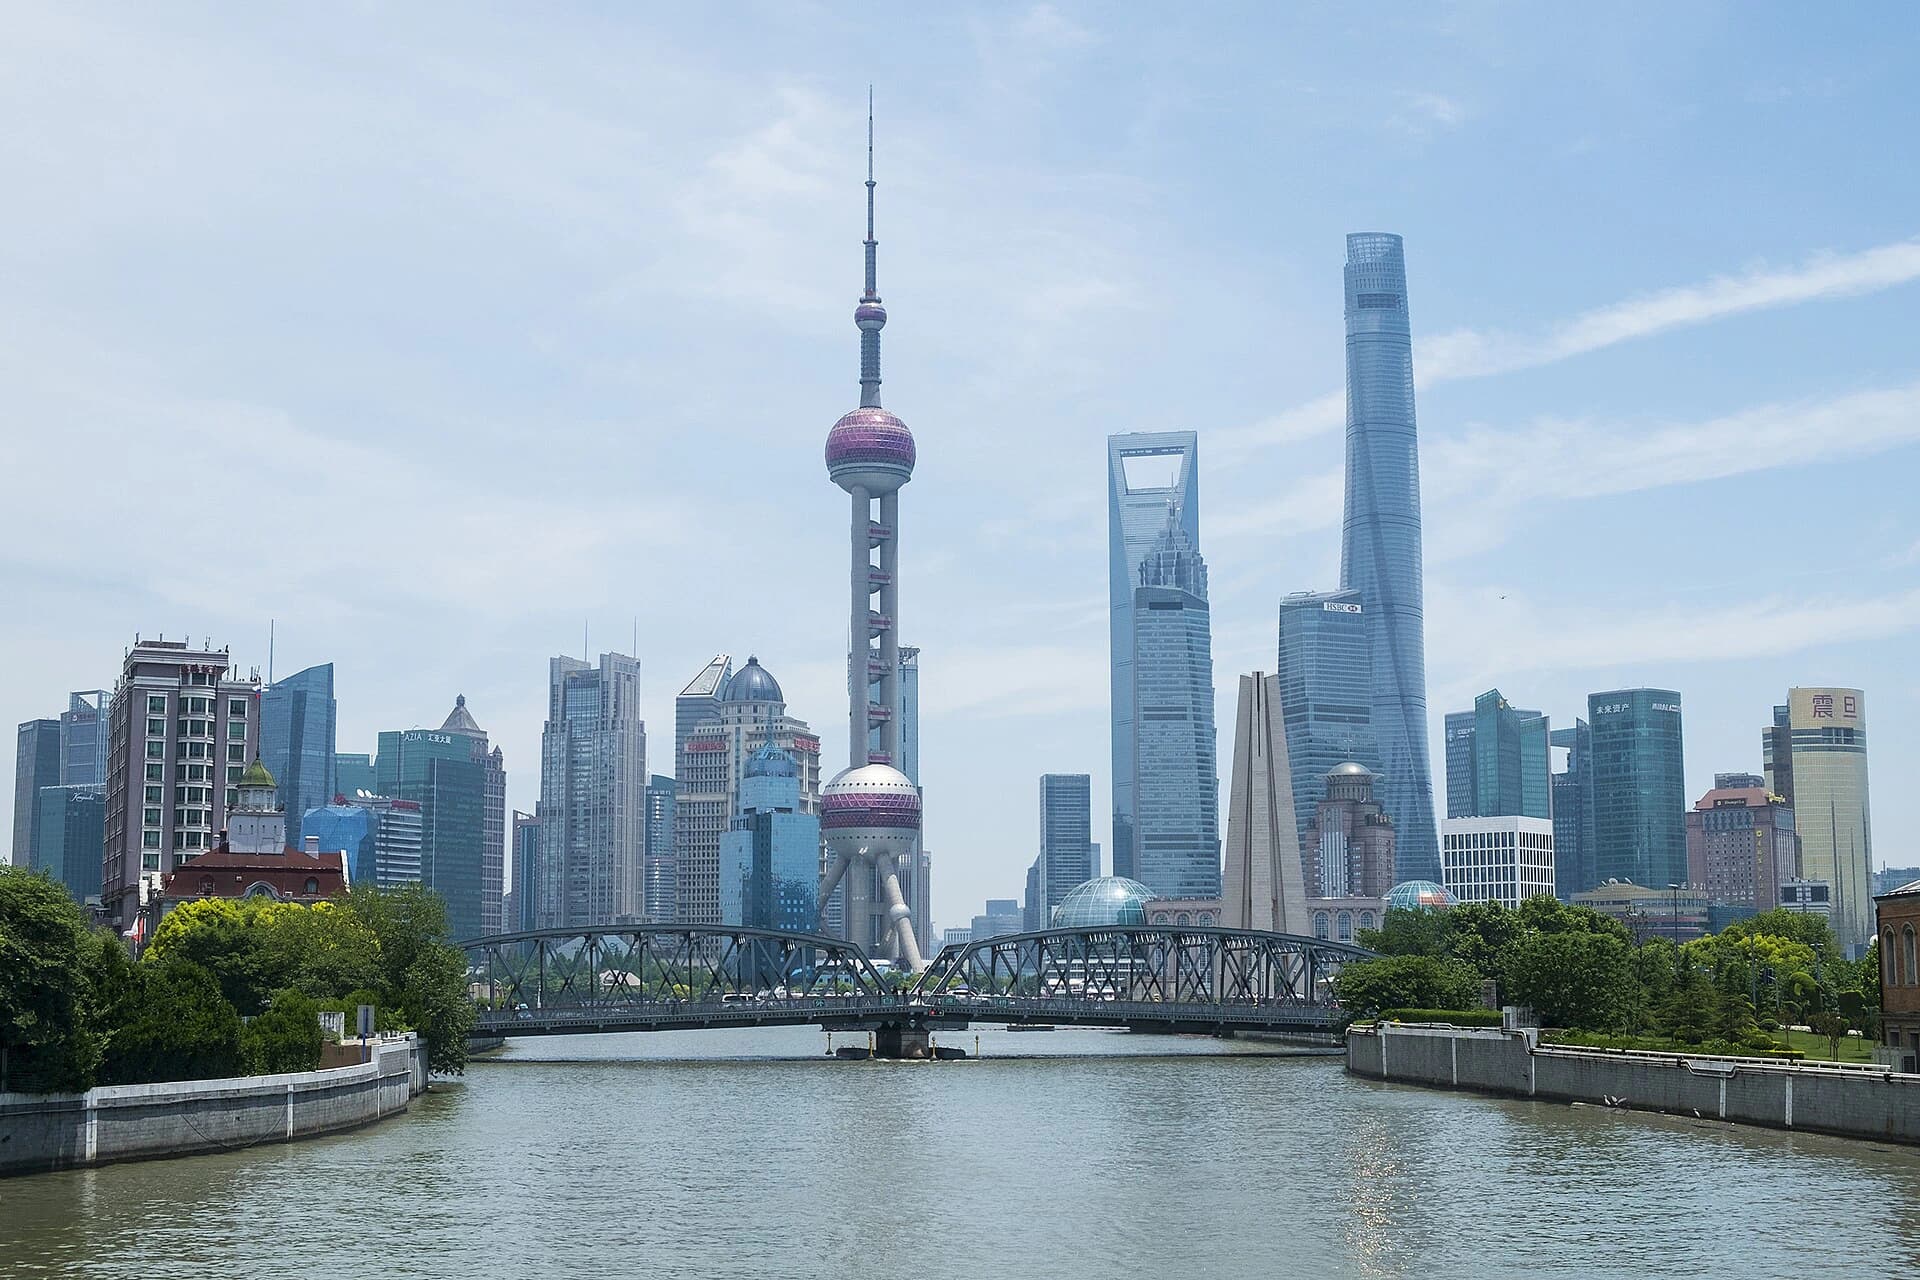
This is the first result to aim for: Suzhou Creek supplies depth, the bridge creates a middle layer, and the Lujiazui towers remain recognizable in the distance. The picture works in daylight, haze or blue hour because it depends on structure rather than a temporary light show.
Photograph by Windmemories, adapted from Wikimedia Commons under CC BY-SA 4.0.Choose the skyline picture you actually want
Different riverbanks produce different photographs. Choose the primary result before deciding where to begin.
- The complete Lujiazui skyline: use the central Bund promenade. A wide lens records the whole bank; a medium telephoto isolates the Oriental Pearl Tower, Shanghai World Financial Center and Shanghai Tower.
- A bridge-framed city: begin at Zhapu Road Bridge and Waibaidu Bridge. This is the strongest choice when architecture and foreground matter more than a perfectly open panorama.
- Old Shanghai and new Shanghai together: use Huangpu Park or the western North Bund. Rotate between the historic Bund façades, the river junction and Pudong rather than pointing east for every frame.
- A quieter blue-hour panorama: make North Bund the main destination. Its broad waterfront gives you more lateral room than the central Bund on a busy evening.
- Boats crossing the skyline: wait beside the North Bund or Gongping Road waterfront. A moving vessel creates scale and a visual break in the open river; you do not need to board it.
- Historic Bund from the water or Pudong: cross only if the live public-ferry schedule fits. The ferry is transport, not a guaranteed photography cruise, and an open view from a particular side is never assured.
- Towers from below: make a separate ground-level loop in Lujiazui. This produces vertical architectural frames, not the across-river skyline shown on this page.
For a first visit, prioritize the complete skyline plus one bridge frame. For a second visit, skip the crowded central Bund and spend the light transition entirely on the North Bund.
Time the route by sunset, not by a copied clock time
Use the local sunset time for your exact date. Blue hour usually begins around sunset and changes quickly during the following 20–35 minutes, but cloud, haze and season affect how much blue remains visible.
Full 3.3 km route
Start at Zhapu Road Bridge two hours before sunset. The verified walking legs total about 3.3 km / 46 minutes without stops. Allow 2.5–3.5 hours for photographs and waiting.
This schedule reaches the North Bund around sunset and Gongping Road during blue hour. It also gives you time to abandon a crowded railing, wait for a boat or make a second exposure without running between locations.
Short 1.8 km North Bund route
Start at the Grand Halls exterior 45–60 minutes before sunset, continue through North Bund Riverside Green Space and finish at Gongping Road Ferry. The two checked walking legs total about 1.8 km / 25 minutes before stops. Allow 90 minutes to 2 hours.
Choose this version when the finished blue-hour skyline matters more than bridges and Bund architecture. It is also the better plan in summer heat, after a museum day or when carrying a tripod.
Morning alternative
Begin at Zhapu Road Bridge shortly after sunrise, then walk to Waibaidu Bridge and the Bund. Morning is better for open pavement, bridge geometry and ordinary river traffic. It is weaker for illuminated towers, but haze often looks more intentional in a pale morning set than in a heavily edited night image.
Shanghai's lighting is centrally managed and can change for seasons, events, energy policy or maintenance. An August 2026 Shanghai government report documented the Bund's normal lights switching on at 19:00 during that summer period, with more than 40,000 people recorded in the waterfront area at one peak moment. Treat that as dated evidence of both the lighting pattern and the crowd problem, not as a year-round promise. Check that day's city notice, then arrive for natural light even if the buildings illuminate later.
The full route at a glance
- Zhapu Road Bridge — bridge, creek and Lujiazui in one layered frame.
- Waibaidu Bridge — steel structure, pedestrians and the river junction.
- Northern Bund viewing platform / Huangpu Park — the cleanest broad skyline in the first half.
- Grand Halls riverside exterior — red brick and Pudong across the confluence.
- North Bund Riverside Green Space — wide skyline, low foregrounds and blue-hour room.
- Gongping Road Ferry waterfront — boats, reflections and a quieter finish.
- Optional ferry crossing — moving river perspective when the current service still runs.
- Taitongzhan Ferry waterfront — Pudong-side view back toward North Bund and the historic waterfront.
Save these English–Chinese pairs before leaving:
- Zhapu Road Bridge — 乍浦路桥
- Waibaidu Bridge — 外白渡桥
- Huangpu Park — 黄浦公园
- The Grand Halls — 世界会客厅
- North Bund Riverside Green Space — 北外滩滨江绿地
- Gongping Road Ferry — 公平路轮渡
- Taitongzhan Ferry — 泰同栈渡口
Stop 1: Zhapu Road Bridge for the layered establishing shot
Open the exact Zhapu Road Bridge map pin. The useful subject is not the bridge alone. Look southeast so the creek leads toward Waibaidu Bridge and the Lujiazui skyline rises behind it.
Make three versions:
- 24–35mm horizontal: include water, bridge and skyline with enough sky for breathing room.
- 50–85mm compressed frame: reduce empty water and make the towers appear closer to the bridge.
- Vertical phone frame: place a bridge arch or lamppost at one side and keep the Oriental Pearl Tower away from the exact center.
The bridge carries normal pedestrian movement. Stand against the side only long enough to compose, keep bags and tripods out of the walking line, and never step into the road for a centered image. A bicycle or pedestrian can add scale when they happen to pass, but do not direct a portrait subject into traffic.
The checked walk from Zhapu Road Bridge to Waibaidu Bridge is about 300 metres / 5 minutes.
Stop 2: Waibaidu Bridge for steel geometry and movement
Waibaidu Bridge (外白渡桥) is more useful as a foreground than as an isolated monument. Work from legal pavements on both ends and let the truss structure divide the frame into sections.
- From the Suzhou Creek side, use the bridge to lead toward the river junction.
- From the southern approach, place one steel arch around a distant tower.
- With a longer lens, wait for a pedestrian, cyclist or vehicle to pass through one geometric opening.
Keep verticals straight unless a deliberate low angle makes the bridge itself the subject. A phone's 0.5× lens exaggerates the nearest steel and can make the skyline insignificant. Begin at 1×; use 2× when you want the tower and truss to relate more strongly.
The bridge becomes slippery in rain and can feel narrow when groups stop. Do not set up a tripod on the crossing. If the desired opening is occupied, take the structural detail and move on; the next stop supplies the unobstructed panorama.
Walk about 300 metres / 4 minutes to the northern Bund viewing platform beside Huangpu Park.
Stop 3: Huangpu Park and the northern Bund for the complete skyline
This is where the set needs one clear, conventional photograph. Face east across the Huangpu and make the complete Lujiazui skyline before experimenting with reflections, silhouettes or passing boats.
Use 24–35mm for the full bank and 50–100mm for a tighter relationship among the landmark towers. If the foreground is only empty water, lower the camera slightly and wait for a vessel. If the river is busy, use the wake as a diagonal rather than freezing every boat at the center.
The central Bund guide explains the full south-to-north architecture walk. On this photography route, do not continue south toward Nanjing East Road. The goal is one clean panorama, a historic-façade reverse view and then a move toward North Bund before the best light disappears.
For the reverse view, turn west and photograph one Bund building with enough promenade and river wall to establish the waterfront. This gives the final album a historic counterpoint to the towers instead of twelve versions of Pudong.
The checked walk from the northern platform to the Grand Halls is about 900 metres / 12 minutes. Follow current crossings and waterfront signs; temporary event barriers can change the precise line.
Stop 4: use the Grand Halls exterior as the old-and-new hinge
The Grand Halls (世界会客厅) occupy restored red-brick buildings near the meeting of Suzhou Creek and the Huangpu. The free photography position is the public riverside exterior. The interior is separately managed, ticketed and reservation-dependent; an open riverside path does not mean you can walk into a conference or exhibition space.
Use the brick wall, garden edge or building corner as a near layer and Lujiazui as the far layer. A 35–50mm view usually keeps both readable. A very wide lens makes Pudong too small, while a long telephoto removes the heritage context that makes this stop different.
Make one image before the lights become dominant. Brick retains texture during late daylight, and the towers can remain slightly brighter in the distance. If the building is hosting an event or a barrier changes access, stay on the signed public path and continue. The skyline remains available from the next section.
The checked walk to North Bund Riverside Green Space is about 700 metres / 9 minutes.
Stop 5: North Bund for the strongest blue-hour result
North Bund is where you should slow down. The angle can contain the Oriental Pearl Tower, the modern Pudong cluster and part of the historic Bund within one broad river scene. Official Shanghai visitor information also recommends this waterfront for the combined skyline view.
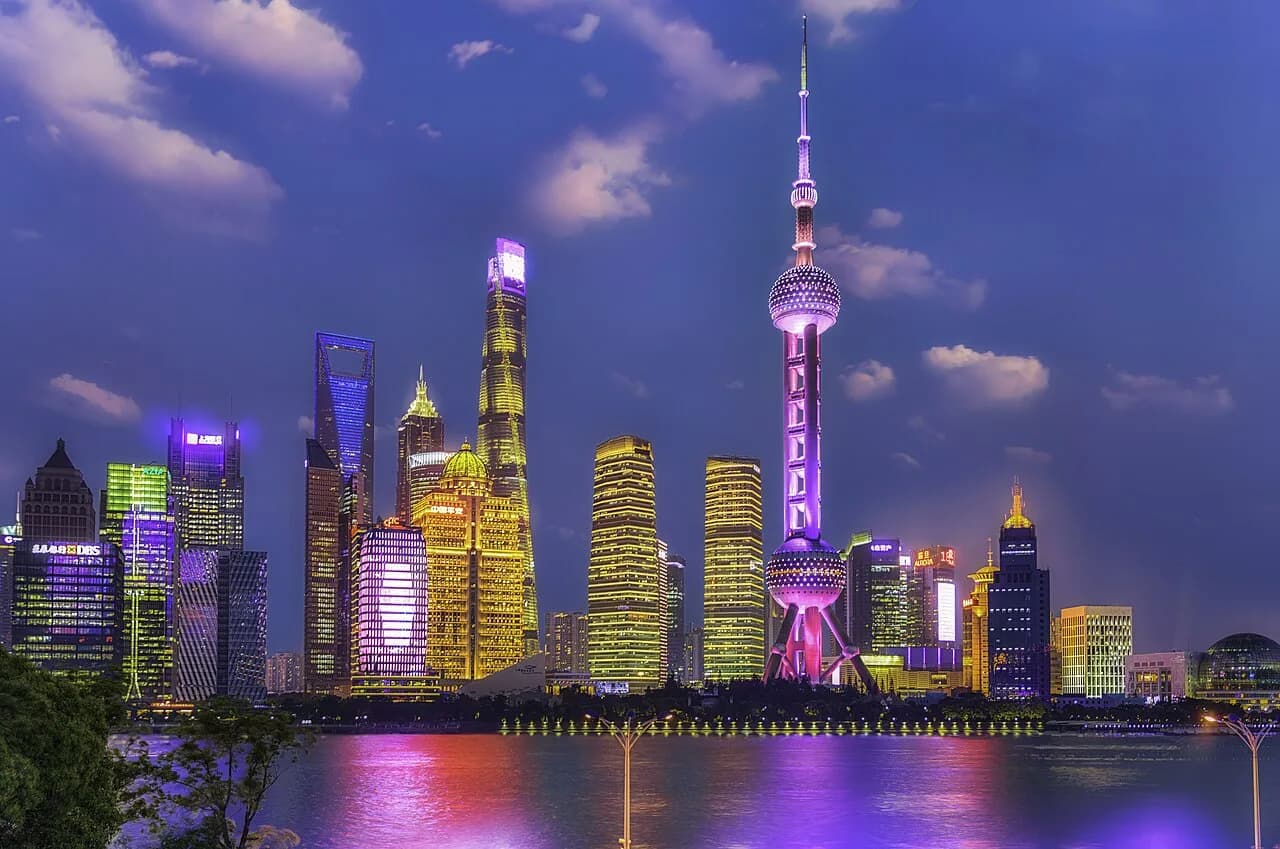
Use three nearby compositions rather than searching for one exact social-media tile:
- Open panorama: keep the horizon level and leave one third of the frame for water.
- Low foreground: use lawn, railing or a legal architectural edge to create depth without entering a planted bed.
- Compressed landmark group: use 70–135mm to reduce the gaps between the Oriental Pearl Tower and the taller skyscrapers.
The popular reflective-panel picture depends on temporary or replaceable surfaces. If a reflective installation is present and publicly accessible, treat it as a bonus. Do not make the entire visit depend on four panels being in the same position as an old post, and do not climb, lean equipment against them or force a perfect reflected seam.
At blue hour, protect the brightest building lights. On a phone, tap a bright tower and reduce exposure slightly. On a camera, make one normal frame and one frame about 2/3 stop darker. Lift shadows later; clipped signs and tower edges cannot be recovered.
Stop 6: Gongping Road for boats, reflections and the final shore image
The checked walk from North Bund Riverside Green Space to Gongping Road Ferry is about 1.1 km / 16 minutes. The route stays near the river but construction or event management can require short inland detours.
The ferry terminal is both transport infrastructure and a useful waterfront anchor. From public space, look for river traffic against the illuminated skyline. A vessel placed below the towers supplies scale and prevents the water from becoming a blank lower half.
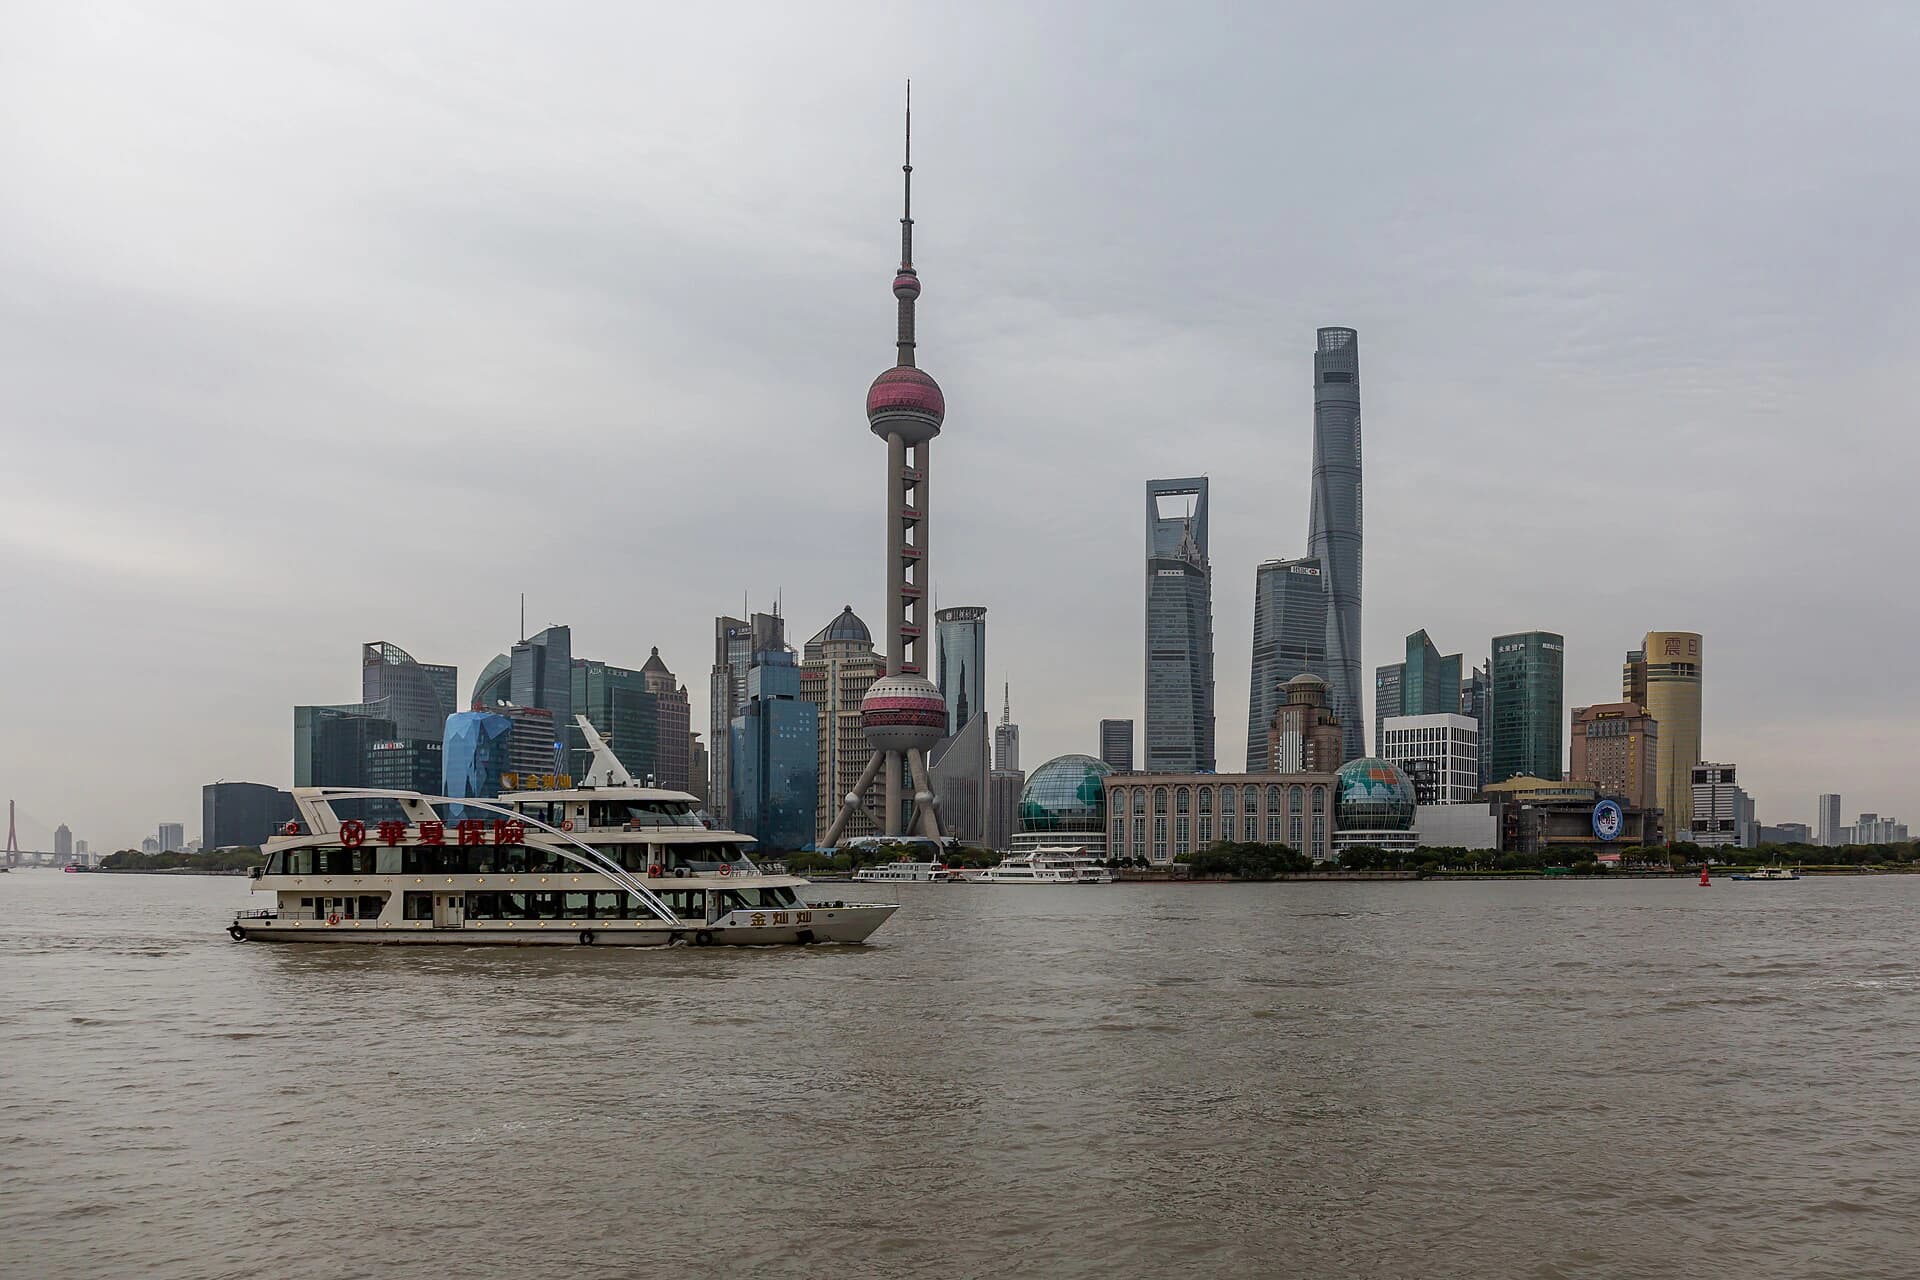
The photograph demonstrates the timing principle: leave open river in front of the boat, begin shooting before it reaches the tower cluster, and keep firing through the balanced position. A commuter ferry, sightseeing vessel or workboat will have a different profile. The exact boat is not the promise; the repeatable idea is skyline plus moving river traffic.
Photograph by Balon Greyjoy, released under CC0 1.0.For a handheld motion frame, use roughly 1/125–1/250 second and raise ISO as needed. For a long exposure, use a stable tripod only where the legs leave a clear pedestrian width. Start around 2–8 seconds, inspect the brightest lights and shorten the exposure if the boat becomes an unreadable streak.
Optional: cross to Taitongzhan only when the live ferry still runs
The Taigong public-ferry line connects Gongping Road with Taitongzhan Ferry in Pudong. A published timetable has historically placed the final departures around early evening, which means a summer blue-hour photographer may arrive too late. Weather, river control, maintenance and holiday operations can also interrupt service.
Check the maintained Shanghai Ferry (上海轮渡) WeChat account's route-information section (云上航线) on the same day. Shanghai's current English ferry information also directs passengers there for updated operating hours. Do not rely on a screenshot, and do not assume the ticket gate will stay open because boats are visible on the river.
If service is operating, board as a passenger first and a photographer second:
- have the accepted payment method ready before the gate;
- keep clear of bicycles, commuters and crew working areas;
- use a wrist strap and keep the phone inside the rail;
- avoid a tripod, flash or repeated movement between sides;
- make a short burst when the skyline opens, then let others use the window.
The crossing is brief. It cannot replace a dedicated Huangpu River cruise when you want a longer after-dark ride, open-deck time and several landmark angles. It is the better choice when you need transport and one changing river view.
After landing, make a final shore image looking back toward North Bund and the historic waterfront. If the ferry is closed, finish on the Puxi side and use Line 12 or a live ride-hailing pickup from a legal road position. The route is complete without the crossing.
Twelve photographs for a complete final set
Do not give every pin equal weight. Use this edit as a goal, then stop when you have the result.
- Zhapu Road Bridge, creek and full distant skyline.
- A tighter bridge-and-Oriental-Pearl frame.
- Waibaidu Bridge steel geometry with one moving subject.
- The complete Lujiazui bank from the northern Bund.
- One 70–100mm landmark compression from the same position.
- A historic Bund façade with promenade context.
- Grand Halls brick and Pudong in one old-and-new frame.
- North Bund open panorama before sunset.
- The same bank during blue hour, exposed for the lights.
- A boat crossing below the tower group.
- A close reflection or water-detail frame without a recognizable skyline.
- An optional reverse-bank view after the ferry crossing.
Delete near-duplicates before sharing. A strong set changes distance, direction and foreground; it does not merely change the color grade.
Phone settings that matter
Daylight and sunset
- Clean the lens before every riverside sequence; humidity and fingerprints destroy small lights.
- Use 1× for most wide views. Use 2× or 3× for compression when the phone has a real telephoto camera.
- Reserve 0.5× for tight bridge geometry. Keep towers away from the edges, where ultra-wide distortion is strongest.
- Tap the skyline, hold to lock focus/exposure if supported, then lower exposure until bright cloud or signs retain detail.
- Make one normal HDR image and one slightly darker image. Heavy HDR produces gray skies and glowing outlines around buildings.
Blue hour and night
- Brace the phone on your body or a permitted rail without extending it over the water.
- Let Night mode finish its capture; moving the phone early creates doubled lights.
- Shorten Night mode when boats are moving. A technically brighter image is not better if every vessel becomes a translucent smear.
- Keep the sky dark blue instead of brightening it to daytime. The contrast between blue ambient light and warm building light is the result you came for.
- Avoid digital zoom beyond the phone's useful optical steps. Crop a sharp 2× frame later rather than recording a soft 8× file.
For a portrait, expose for the person's face before the sky becomes very dark. At night, a small continuous light held close and low is more controllable than direct flash. Keep the session short and the promenade open.
Camera setup without carrying a studio
One body and one general zoom are enough. A 24–70mm lens covers most of the route; add a 70–200mm only when skyline compression is the main goal.
- Handheld blue hour: begin around f/4–f/5.6, 1/125 second and auto ISO with a sensible upper limit.
- Tripod skyline: begin around f/5.6–f/8, ISO 100 and adjust shutter speed after checking highlights.
- Boat motion: use 1/125–1/250 second to keep a vessel legible; use a deliberately longer exposure only when you want a streak.
- Sharp lights: f/8 is usually enough. Extremely small apertures add diffraction and turn every lamp into an oversized star.
- Mixed exposure: bracket a darker frame when signs or tower edges clip, but keep the merge natural and aligned.
Turn image stabilization off only when the camera and lens manufacturer recommends doing so on a stable tripod. Use a two-second timer or remote release. Keep the center column low in river wind.
Weather changes the subject
Clear air
Use the full route and longer lenses. Clear air supports tight skyline compression and small architectural detail.
Haze
Move closer to the subject rather than trying to remove all haze in editing. Prioritize Waibaidu Bridge, Grand Halls brick and the North Bund foreground. A 24–50mm scene with real depth works better than a 135mm skyline flattened into gray.
Light rain
Use reflections, umbrellas and wet stone, but keep equipment compact. Bridge surfaces and polished waterfront areas can become slippery. A hood protects the lens better than repeatedly wiping a front element in the rain.
Heavy rain, lightning or strong wind
Do not wait beside exposed water with a tripod. Move to a safe indoor plan and return on another evening. A paid observation deck is also a poor fallback when low cloud hides the skyline; choose a museum or the covered parts of a neighborhood route instead.
Public space boundaries
This page deliberately excludes viral views that depend on uncertain access.
- A cafe purchase does not guarantee a window, tripod position or portrait session.
- A hotel lobby, guest floor or roof is not public because someone posted a view from it.
- The Grand Halls riverside exterior and its managed interior have different access rules.
- Temporary terraces, events and mirrored installations can close or disappear.
- Do not climb river walls, enter planting, move barriers or stand in a cycle lane to reproduce an angle.
- Do not fly a drone along the core Huangpu waterfront without the permissions and live airspace checks required by current rules.
If staff close one position, use the next public viewpoint. The route has enough visual changes that no single frame is worth arguing over.
Fit the photo route into a Shanghai trip
Use the main Shanghai travel guide to choose neighborhoods and fixed reservations first. The North Bund and Suzhou Creek city walk is the better full day when industrial heritage, the Postal Museum area and 1933 Old Millfun matter as much as the skyline. This page is the better choice when the final photographs and light transition are the day's main result.
The classic one-day Shanghai itinerary already combines the Old City, Pudong and the Bund. Do not attach the full 3.3 km photo route to that itinerary. Replace its shorter Bund sunset section with the short North Bund version, or reserve this route for a second evening.
For a completely different visual language, use the plane-tree architecture photo walk. The skyline page is about water, scale, bridges and light; the western walk is about canopy, brick, garden setbacks and street-level detail.
Final checklist
- Check sunset, visibility, rain and wind for the exact date.
- Choose the full route or short North Bund route before leaving.
- Save all map pins in Chinese and charge the phone.
- Pick four priority frames in case crowds or barriers slow the walk.
- Arrive for daylight; do not arrive only for a rumored switch-on moment.
- Expose for the brightest tower lights during blue hour.
- Keep tripods, bags and portrait subjects out of public movement lines.
- Check the live ferry channel before treating the crossing as part of the plan.
- Finish the set when you have changes in foreground, distance and direction.
The route succeeds when the final album explains Shanghai's river geography: creek to bridge, old bank to new bank, daylight to blue hour, and still architecture to moving boats. That story is stronger than a longer list of isolated “secret” locations.